Two Sides of A Coin

My husband and I wanted a place to share our projects...I do crafting (e.g. cards, sewing, etc...), household projects, and parties for kids. My husband makes toy trucks, household projects (e.g. closet redesign), and helps with party decorations and games. While he's a professional contractor, we do this for fun. We both cook, but I am more likely to try new and different recipes. We'll be trying out Pinterest items and reporting back.

Sunday, November 18, 2012

Low-Fat Lemon Yogurt Cake - Healthy & Yummy

Loved this lemon cake.  It is dense like a pound cake, but very moist and subtle.  Can I just say it again - I loved it!!

Inspired by this pin, this recipe originally came from cravingchronicles.com


Low-Fat Lemon Yogurt Cake

Makes one 8 by 4 inch loaf cake

Ingredients

1 1/2 cups all-purpose flour
2 teaspoons baking powder
1/2 teaspoon salt
1 cup plain low-fat Greek yogurt (can use regular, too)
1 cup sugar
1 whole large egg, 3 large egg whites
2 teaspoons grated lemon zest (2 lemons)
1/2 teaspoon pure vanilla extract
1/3 to 1/2 cup vegetable oil


For the glaze:
1 cup confectioners’ sugar
Freshly squeezed lemon juice


Directions

  1. Preheat the oven to 350° F. Grease and flour a loaf pan. Line the bottom with parchment paper.
  2. Measure the flour (scoop and level), baking powder, and salt into a small bowl and whisk until combined. In a large bowl, mix together the yogurt, sugar, eggs, lemon zest, and vanilla. Add the dry ingredients into the wet ingredients and slowly whisk together. Fold the vegetable oil into the batter until it’s all incorporated. Pour the batter into the prepared pan and bake for about 50-60 minutes, or until a cake tester placed in the center of the loaf comes out clean.
  3. When the cake is done, allow it to cool in the pan for 10 minutes.
  4. For the glaze, combine the confectioners’ sugar and 2 tablespoons of lemon juice. If the glaze is still too thick, continue adding 1 tablespoon of lemon juice until it’s runny enough to pour.
  5. Carefully place on the cake a baking rack over a sheet pan or a sheet of parchment paper. While the cake is still warm (but not hot!), pour the glaze over, allowing it to drip down the sides.


Wednesday, November 14, 2012

Hawaiian Chicken in a Pot.


Inspired by this pin. This basic recipe was easier.

Hawaiian Chicken in a Pot


Ingredients

4 boneless, skinless chicken breasts
1 cup pineapple juice
1/2 cup packed brown sugar
1/3 cup light soy sauce


Directions

  1. Spray crockpot with oil.
  2.  Add everything to crockpot.
  3.  Cook for 4 hours on low.  Left on warm for another 3 and a half.   If you don't need it to go for 9.5 hours, you can cook it on low for 6 to 8 hours straight.


I was not a fan of the no vegetable or fruit included, so I would definitely add a can of chunk pineapple.  It would also be great with chopped peppers, but my DH is not a fan of peppers.

We gave this recipe a 4 out of 5 stars.

Tuesday, November 13, 2012

Halloween Decorations - One Last Post for 2011

Here's a breakdown of some of the items I used to decorate for Halloween this year.  I'll provide links to directions and fun information below each one.

Feel free to follow my Halloween Craft pins on Pinterest to see what I might make for next year.   You can see other decorations I made in other posts - monsters, banners, and more.


Containers with Harry Potter Labels
I found these Harry Potter labels - a free printable.  I took some old jars - the ones on the end are made from liquid coffee creamer containers.  The second from the left is made from dry coffee creamer and the other was an old salsa jar.  The first container was just painted, then the label glued on, and then a second coat added with some brush strokes over the edge of the labels. The second container of "slug repellent" was too fun - I took antiquing medium and painted over the jar. I let it dry, attached the label and then added a few rough strokes on top - like it had overflowed.  Looked disgusting, which is perfect for Halloween


Eyeball pumpkin - first attempt.
Pumpkins are such a great medium - your only limit is your imagination.  The blue-eyed side looked a bit odd - finally decided that the blue area was too big.  So I just turned it around and tried again.  You can see the difference in the green.  Much better..either end works!  See the photo at the end of this post to see what is looked like on our front porch.


Eyeball Pumpkin


Pantyhose Covered Pumpkin
I had a pair of lacy pantyhose that I got a runner in, so I held onto the good leg until Halloween, just to make this lacy pumpkin.  I balled the top of the hose up and tied it into a knot.  This made a topper for the pumpkin - looks pretty cute, I think.

A few bats on the mirror reflect the big sweeping bat decoration area.
Mask Covered Pumpkin
Two of My Pumpkins
Our China Cabinet with added Halloween pieces - a painted craft pumpkin with our initials, a witch's hat propped up on top, a sign hung casually on the door handle. And the white you see on the right side - that's the ghost that I strung across one of our windows.  So easy and a big impact.
Halloween Garland
I made this Halloween Garland to hang over the island separating our kitchen and dining room. I got the idea from Pinterest and found free downloadable templates.  I added black strings to the top.  The photo isn't great - because the opening is in the middle of our house, I had my DH hold a table cloth behind it to block the light and junk on the other side of the countertop. 

A few bats on the mirror reflect the big sweeping bat decoration area.

Bats swooping across our walls and ceiling
These bats are great. I got the idea from Pinterest and then tracked down a bat template.  Cut the bats out of black scrapbook paper and bent the wings slightly.  Arranging them in a swooping motion is what really made the decoration pop - I got more compliments on this than anything else.


Our milk jugs for outside.  Drew simple faces on these..you can see them in the front stoop photo below. I filled them with water and a glow stick...added a little fun to our stoop. They didn't glow as brightly as I had hoped.


Kids Craft Area at Our Halloween Party

Tulle Lights
Tulle Lights
 I set up a kids craft area at our party. We bought the butterfly shaped masks from Michael's.  We cut out 50 basic masks from colored foam. We provided Halloween themed foam stickers.  The kids loved it.  Gave them something to do and they got an personalized party favor. It also kept them from being underfoot every minute of the party.  I hung up purple lights, but thought they looked a little plain.  So I took strips of tulle fabric (about 7 to 10 inches each) and tied them next to each light.  After I got one on each side of every light, I just kept going - adding more and more.  I actually think they could use a bit more.  I bought four yards of black tulle and only got about halfway through it before the party.  But, I think it makes the lights more interesting and fun.
 
Our Front Window during the day
Inspired by this pin, I made these on a whim with black construction paper.  Just cut out a shape that appears like a monster.  Don't make the details too small -- it will get lost.  I used a white Styrofoam plate for the white eye and purple tissue paper for the two eyes.  We put a string of Christmas lights behind them.  Next year, I'd like to get orange lights.


Our Front Window at night

Our Front Stoop...see the pumpkins, milk jugs and the tombstone on the right.  You can also see the monster in the window.
Ghosts in the trees


My final outdoor decorations were ghosts in the trees.  I took small kitchen trash bags, cut off the end with the strings/handles, and stuffed them with newspaper.  I then took a twisty tie and added one to the top of each ghost - word to the wise, be sure to put it through the plastic and some of the newspaper or it will tear in the wind.


Hope you enjoyed these photos of our decorations.  I didn't capture every detail and I really want to do more outside items for next year.  I'll be watching Pinterest for ideas.

Respect the Bird


I don't normally do posts that don't center on a craft or a recipe or some kind of DIY project. But, I have to say something about Halloween, Thanksgiving and Christmas.

Halloween, Thanksgiving, and Christmas are three different holidays - it should not be a sprint from start to end.

I loved Halloween, so fun and so many great crafts to do.  I love seeing the kids come to the door, talking with my nieces and nephews about their costumes, and finding fun recipes to try during that time.

I am looking forward to Thanksgiving for a totally different reason. I really want to embrace the day and be grateful. I'm even particpating in Twitter's #thankful30 movement.  I want to slow down, think about my life, and relax.

And the day after Thanksgiving, I am all in Christmas - Black Friday shopping is awesome.  I love the lights, the crafts, the music, the movies, the gifts, etc... But, not at the expense of Thanksgiving.

For those of us who have Thanksgiving off, we should be grateful for that and return the favor to those who are being forced to work.  Thanksgiving is a day for family, not stores.  It's a day to be grateful and the world might be a better place if everyone just stayed out of the stores.

So, I am urging you - don't do it.  No matter what the stores promise you.  Don't give them your business after midnight.  Respect the bird.


Monday, November 12, 2012

Monster Craft..New Orleans Inspired & Elvis Inspired

I actually made three monsters this year for Halloween.  These two were my favorites.  I hope you enjoy them.  Here you can see an overview of our Halloween decorations and fun food.


All you need are milk jugs -- which you can paint any color...you can see I painted this one red.  No special paint - but each needed at least two coats.  Some others needed three coats.

You can make eyes out of many items - this sparkle paper was fun and it made it fun.  I also gathered jewelry and beads to use.  It really can be made of almost everything.  

You can cut a variety of mouth shapes...I left the handles on them to make them easier to move around.
My "Elvis" Inspired Monster..A little attitude with the hair.  Note the "backwoods hick home" below - my husband made the house for our wedding, but thought the furniture outside made it funny for Halloween.
New Orleans Inspired Monster


Tuesday, November 6, 2012

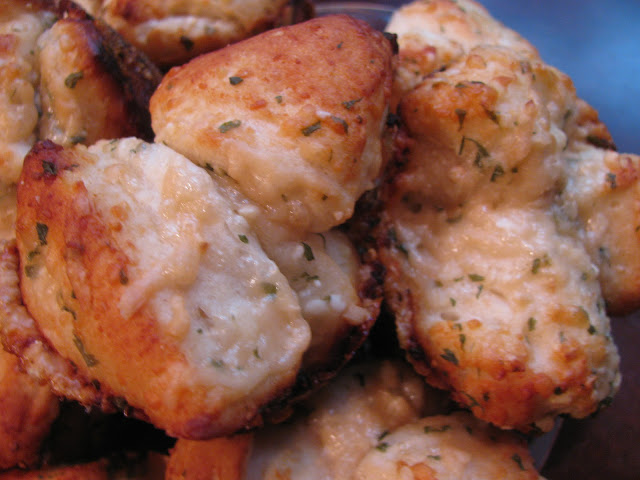
Garlic Monkey Cups

The original recipe came from Real Mom Kitchen blog.  I made a few adjustments without really realizing it.

The biscuits - I got Reduced Fat Buttermilk Biscuits - they were so huge. I cut each biscuits into 6 pieces and only fit 4 or so in each muffin slot.  And we baked for 12 minutes and I thought it was overdone, so here's my version of her recipe.

Garlic Monkey Cups

 Ingredients
  • 2 (7.5 oz) cans reduced fat buttermilk biscuits
  • 9 Tbsp butter, melted
  • 5 cloves garlic, minced
  • 4 Tbsp dried parsley flakes
  • 1/2 cup fresh grated Parmesan cheese plus 2 Tbsp. additional to sprinkle on top if desired

Directions

  1. Cut biscuits into 6 pieces and place in a bowl. I like to use kitchen shears to cut up the biscuits.
  2. Combine the melted butter, garlic, parsley, and 1/2 cup Parmesan cheese together and pour over the biscuit pieces.
  3. Gently toss the biscuit pieces to get evenly coated with the butter mixture.
  4. Using a 12 cup muffin tin, place 6-7 pieces of the coated biscuit dough into each muffin cup. Use the additional 2 Tbsp of Parmesan cheese to sprinkle on top of the breads in the muffin cups.
  5. Bake at 400 degrees for 10-12 minutes until golden brown. Serve warm. Makes 18 garlic monkey cups.
 I got a lot of compliments on them.  We give them a 5 out of 5.