Two Sides of A Coin

My husband and I wanted a place to share our projects...I do crafting (e.g. cards, sewing, etc...), household projects, and parties for kids. My husband makes toy trucks, household projects (e.g. closet redesign), and helps with party decorations and games. While he's a professional contractor, we do this for fun. We both cook, but I am more likely to try new and different recipes. We'll be trying out Pinterest items and reporting back.
Showing posts with label bake. Show all posts

Thursday, June 27, 2013

Amazing Stuffed Dates..Party Food (for One?)


I admit it - these are a total weakness for me. I don't know what it is, but wow! I love Blue Cheese Stuffed Dates Wrapped in Bacon.

So, what's it in?

Stuffed & Wrapped Dates

Ingredients

Bacon (sliced in 3rds)
Dates (Medjool)
Blue Cheese Crumbles

Directions

  1. Preheat the oven to 375 degrees.
  2. Slice dates in half, and open them up. Take out the seed in the middle. Pinch off pieces of blue cheese, and place them into the center of the dates. Close the halves of the dates, and wrap a 1/3-slice of bacon around the outside. Secure each one with a toothpick. Arrange in a baking dish or on a baking sheet with sides to catch any grease.
  3. Bake for 30 to 40 minutes in the preheated oven, or until the bacon is crisp. Turn dates over after the first 20 minutes for even cooking
I cannot even explain how good these are. The cheese gets gooey, the dates soft, the bacon has nice crispness.


 And I will admit, it's supposed to be a party food.  But sometimes, I just make them for me. Pull out just about 1/2 dozen dates, and cut up enough bacon for it.  Voila -- all for me. I've also made it with goat cheese - also good. But blue cheese is the best.

I know I should be ashamed, but I LOVE IT!


Thursday, December 6, 2012

Lemon Sandwich Cookies

I took two lemon desserts with me to "Friends-Giving" a few weekends ago. I made these first, but I was afraid that they wouldn't serve enough people. Beware - it only makes like 12 cookies - you have to use 2 cookies for each sandwich, so it takes lot of cookies!  I was surprised how few it made, but they were worth every second in the kitchen.

Inspired by this pin, this recipe comes from itty bitty kitchen.

Lemon Sandwich Cookies:
  • 14 tablespoons unsalted butter, room temperature (this is important!)
  • 1/4 teaspoon salt
  • 1/2 cup confectioners sugar
  • 1 1/2 cups all-purpose flour
  • 1/2 cup cornstarch
  • 1 teaspoon vanilla extract
  • zest of one lemon
Filling:
  • 1 cup confectioners sugar
  • 1/4 cup unsalted butter, room temperature
  • juice of one lemon
  1. Preheat oven to 300 F.
  2. In a large bowl cream the butter, salt and sugar until light and fluffy on a medium setting, roughly 3 minutes. Reduce the speed to low and  incorporate the vanilla and lemon zest, scraping down the sides as you go. Sift the flower and cornstarch into the mixture and beat on a low setting until just combined.
  3. Take small portions of the mixture and roll into balls, continue until you have 25-30 (I made mine quite large, I ended up with roughly 23) pieces. If you want them to be as even as possible, roll out the mixture until it forms a log then use a clean knife to section into 30 pieces.
  4. Place them on a baking tray lined with wax paper, gently press on each piece with a fork until it has left an imprint. You can also press on them gently with your fingers, if you do not wish to leave an imprint.  (I used the criss-cross look like a peanut butter cookie because I thought they were cute.)
  5. Bake for 20 minutes. let them cool completely.
  6. For the filling beat the sugar, butter and lemon juice on a medium setting until incorporated. Keep adding sugar until you get a thicker consistency - you don't want the filling to squish out all over, but rather support the top cookie.
  7. Use the back of a spoon, or a knife to ice one side of the cookie then sandwich them together. Try to find two which are similar sizes.  The biscuits can be kept for up to 5 days in an air tight container.


All I can say is WOW - these were awesome.  A 5 out of 5.  Totally worth every minute.  I loved them and so did others.  I hope you do, too!


Wednesday, December 5, 2012

Chicken Parm Bake - My Way

Inspire by this pin... by the Food Wishes blogger  .  I didn't like having to watch the video to get all the directions.  But, I like the idea of a healthy, baked version of Chicken Parmesan.  I did downsize the recipe, so it wouldn't be so much food - we're only feeding two at our house most of the time.

Ingredients:

2 tbsp olive oil
2 cloves garlic, crushed
hot red pepper flakes, to taste 
3 boneless skinless chicken breasts 
1 can tomato sauce
oregano (a few tsps)
basil (a few tsps)
thyme leaves (one tsp, as DH is not a fan)
8 oz mozzarella, shredded
4 oz Parmesan, grated
1 (5-oz) package garlic croutons (Used Arnold brand)


Directions

  1. Prepare the 9x9 pan by pouring the olive oil into the bottom and then coat it with garlic and hot red pepper flakes.
  2. Put the chicken breasts on top.
  3. Pour can of tomato sauce on top. Season with basil, oregano, and thyme leaves.
  4. Add about 1/2 the cheese.
  5. Add the croutons.
  6. Put the other 1/2 of the cheese.
  7. Bake at 350 degrees for 30 minutes.

I'll be honest - I didn't really measure most of the ingredients, just added what I thought looked like enough to cover the chicken breasts.  So, the ingredient list is not exact.  Use what you like.   NOTE: My chicken finished after 30 minutes (plus resting for 10 - do not underestimate the resting period which will allow the chicken to cook more). Your cooking time may be up to an hour depending on the size, shape, and temperature of your chicken. Please use a meat thermometer to check doneness (155 degree F.)   We gave this dish a 4 out of 5.  We both enjoyed it.  Hope you do, too.

Wednesday, October 31, 2012

Eyeball and Monster Foods - Focus on Halloween Party Menu

Details of our Halloween Party food -- I wanted to focus on a certain type of food. So, I started looking for eyeball and monster foods.  After some time, I went with what I had time to get done and was within my realm of abilities.

Here's our complete menu. I linked to the original recipe and if I made significant changes, I am going to post those below.  

Hopefully, you'll find something you'll want to use. 


Our Menu

Entrees

Tombstone Sandwiches, original recipe, see below for more info
Tortured Squash Soup, a remake of my butternut squash and apple soup
Ghost and Eyeball Pizzas, see below

Appetizers/Side Dishes

Witch Vomit, original Pinterest item
Punkin Chunk 
Hummus Veggie Tray

Desserts

Ogre Eye Cookies, original recipe
Witch's Hats, original recipe, see below for more info
Jello Worms, original recipe, see below for more info
Ghost S'Mores Brownies, original recipe, see below for more info
Monster Eye Cupcakes, original recipe, see below for more info
Monster Munch, see below

Drinks

Blood Punch


Tombstone Sandwiches

Ingredients

Hoagie Rolls (cut in half)
2 cans, Canned Chicken
2 tbsp, Miracle Whip
2 tsp Brown mustard
1 small Cucumber, peeled and well- chopped
3 tsp, Tarragon

Directions

1. Combine all ingredients in a bowl.
2. Spoon into hoagie rolls.

Notes for Future: I just leaned them up against each other on a platter.  The effect would be stronger if they had been in a bed of shredded lettuce.


Ghost Pizza and Eyeball Pizza

(I only a picture of the post-cut ghost pizza -original crust recipe is from Cottage Living magazine, so old that my paper copy is wrinkled and dirty.)

Pizza Crust

Ingredients

2 cups bread flour
2 cups wheat flour
1 (1/4 ounce) envelope active dry yeast
1 tbsp salt
2 tbsp olive oil

Directions

  1. Dissolve yeast in 1/2 cup warm water (100 to 110 degree). Let stand 10 minutes (mixture should be creamy and bubbly.) Combine yeast mixture with 1 cup warm water and remaining ingredients in a large bowl of a stand mixer fitted with a dough hook. Mix at medium 5 minutes or until smooth and elastic. (Dough will be slightly wet.) Place in a large, lightly greased bowl. Cover with lightly greased plastic wrap, and let rise 2 to 3 hours in a draft-free environment. (Dough will double/triple in volume.)
  2. Push dough down gently, turn into a floured surface, and divide into 3 portions (for three large pizza, can also do 6 small pizzas). Form into round balls, cover with lighly greased plastic wrap, and let stand 20 minutes.
  3. Stretch dough gently into the Halloween shapes - make one look like a ghost and the other into an ellipse for the eye - directly on baking stones (I always use Pampered Chef) sprinkled with flour.  Top as desired to look like an eye or ghost.
  4. Bake in preheated 450 degree oven for 10 to 15 minutes.

Toppings

Mozzarella, pre-shredded cheese
Pepperonis - for mouth
Black Olives - for black part of eyes

Witch's HatS

Ingredients

Fudge Stripe Cookies
Hershey Kisses
Chocolate for melting (I bought Wilton's melting chocolate) 

Directions

Fudge Stripe cookies flip over, melt chocolate (I picked up neon green), and make a circle around the middle hole. Then push a Hershey's Kiss into the center.

Easy peasy. 


Thinking of doing at Christmas and using white and red for Santa Hats 


Worms

So disgusting, but so worth it in terms of appearance.


Ingredients

100 flexible plastic straws (The straws with a bendable neck make the most realistic worms by adding ridges to the worm.)

Empty, clean 1-quart milk or orange juice carton to hold straws (The straws will fill up to the height of the container, the taller the better.)

1 package (6 ounces) raspberry or grape flavor gelatin
3 envelopes unflavored gelatin
3 cups boiling water
3/4 cup whipping cream
12 to 15 drops green food coloring

waxed paper

Directions

  1. Combine both kinds of gelatins in a bowl and add boiling water. Stir until gelatins completely dissolve. Chill until lukewarm, about 20 min.
  2. Meanwhile, gently pull straws to extend to full length; place in tall container with bendable necks at the bottom.
  3. Blend cream and food coloring with the lukewarm gelatin mixture. Carefully pour into the straws. If the coloring is off, just get the red food coloring out and try to adjust the coloring.  I think mine had a bit too much green.
  4. Chill until gelatin is firm, at least 8 hours, or cover and chill up to 2 days.
  5. Pull straws from container or, if you’re using a carton, simply tear the carton away from the filled straws. Pull straws apart. Run hot tap water for about 2 seconds over 3 to 4 straws at a time. Starting at the empty ends, push worms from straws with your fingers.
  6. Lay worms on waxed paper-lined baking sheets. Cover and chill until ready to use, at least 1 hour or up to 2 days. Worms will hold at room temperature for about 2 hours.  I filled a bowl up of the worms and placed that bowl in a bowl of ice - the worms lasted hours.

Ghost S'More Brownies

Graham Cracker Crust
1 stick of unsalted butter, melted 
1 1/2 cups crushed graham cracker crumbs 
2 tablespoons sugar 
Pinch of salt

Directions

  1. Press the crumb mixture evenly over the bottom of a well-buttered 8 x 8 pan~ the scarily perfect size for 3 rows of 4 marshmallow ghosts.
  2. Bake crust 10 minutes at 350 degrees.

Top of S'more Ingredients

Brownie Mix, plus ingredients for brownies
Peeps - 12 Ghosts
Chocolate Chips
Mini Chocolate Chips (@12) 
 
Directions
  1. Pour your brownie batter on top of the graham cracker crust and bake according to recipe/mix directions.
  2. Added a layer of chocolate chips during the 5 minutes of baking time for more chocolatey-s’more-goodness and to help the marshmallow spooks stick to the brownies.
  3. Place your PEEPS® Ghosts on top your chocolate chip/brownie layer and broil very briefly!  If you do and burn them to death like I did, rescue them, scrape off the black part and put on new ghosts and make another attempt.


Monster Cupcakes

Ingredients

Devil's Food Cupcake Mix & Ingredients
Icing
Purple sprinkles
Marshmallows
Chocolate Chips

Directions

  1.  Make the cupcakes according to the box directions.
  2. Frost the cupcakes.
  3. Sprinkle icing with purple sprinkles.
  4. Place a large marshmallow on sideways.  Use a bit of icing to stick a chocolate chip in the center.
Notes for future:  Pre-pour all the sprinkles into a bowl. Dip the frosted cupcakes into the sprinkle - you would get fuller and better coverage.  Also, either make mini cupcakes so the large marshmallows look bigger or try two large marshmallows - would increase the "wow" factor.


Monster Munch

Basically a Halloween trail mix...

Ghost Poop - mini marshmallows
Witch's Nails - candy corn
Scarecrow Stuffing - rice chex
Worms - sour worms
Bat Poop -chocolate covered raisins
Kidney Stones - dried cranberries
Pumpkin Hearts - dried mango

Throw it in a bowl, make a cute sign and you are ready to roll!


Monday, October 15, 2012

Goat Cheese with Herbs - Two Amazing Recipes with Bacon

Pass the Sushi's Original Recipe Photo looked like...
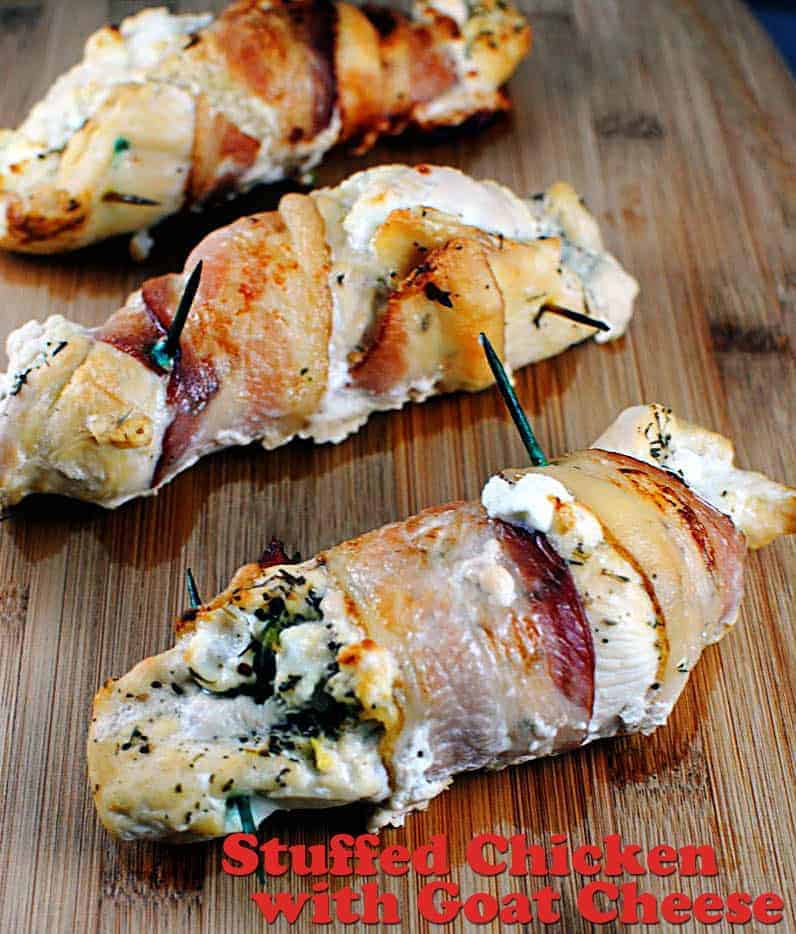
Another Pinterest recipe success....  plus a bonus dish below that a friend made for me last year.  The chicken dish comes from Pass the Sushi.  Here's my take on it.  Below you'll find a recipe for Stuffed Bacon Wrapped Dates. 

Because once you've opened a pound of bacon, you might was well consume it.

Stuffed Chicken with Goat Cheese

Ingredients

3 chicken breasts
1/4 cup goat cheese
1/2 teas basil
1/2 teas thyme
1/4 black pepper
3 slices bacon
toothpick
Olive Oil

Directions


  1. Slice goat cheese into thin strips.
  2. On a flat surface pound out your chicken to 1/4 to 1/2 inch thick. Sprinkle goat cheese in the center of each piece of chicken and sprinkle basil, thyme and black pepper evenly over each. Using toothpicks to secure, fold the chicken up and wrap in bacon.
  3. Preheat oven to 375 F.
  4. Heat oil in a skillet. Place chicken in skillet and cover for 5 minutes. Rotate and brown on all sides.
  5. Place a new baking dish and bake along with the other dish below for 15 minutes.


Stuffed Bacon Wrapped Dates

Ingredients

Medjool Dates
Bacon
Goat Cheese

Directions

  1. Pit the dates by slicing them open on one side and extracting the pit in the center. 
  2. Fill the center with goat cheese.
  3. Cut the bacon in half.
  4. Wrap bacon around the dates and secure with a toothpick.
Both recipes get a 5 out of 5 stars from me.

I might use smaller chicken breasts next time, but otherwise, it rocks.  


Enjoy...

Saturday, October 13, 2012

Healthier Taquitos

Fast, easy and healthy...my favorite way to make a meal.

Again, I pinned this and wanted to give this baked version of taquitos (or flautas, as she calls them) a shot.  My DH loves taquitos, but I have never made them.  Somehow, that deep-fried meat just never appealed to me.  But, baked I was willing to try.


Baked Chicken and Spinach Taquitos

Yields:10 taquitos
Prep Time: 15 minutes; Total Time: 45 minutes

Ingredients

  • 3 boneless, skinless chicken breasts
  • 16 ounces Beer (or chicken broth)
  • 2 cups Water
  • 1 teaspoon Paprika
  • 1 teaspoon Kosher Salt
  • 1 teaspoon Garlic Powder
  • 1 teaspoon ground Cumin
  • 1 teaspoon Chili Powder
  • 3 cups Baby Spinach, chopped
  • 5 burrito-size Flour Tortillas (9 inches) (we used half Carb Friendly tortillas)
  • 1 bag Mexican Cheese, 2%, shredded
  • 1 tablespoon Olive Oil, or cooking spray

Directions

  1. Preheat the oven to 450 F.
  2. Put the chicken in a deep sided saute pan and cover with the beer and water. Bring to a boil, then reduce heat and simmer for 10 minutes. Remove the chicken from the liquid and shred it. Mix together the chicken and seasonings.
  3. Pour out all but 1/4 cup of the cooking liquid. Add the spinach and cook over low heat until for 2-3 minutes, or until the spinach is wilted.
  4. Cut the tortillas in half. Spoon 1/10th of the chicken (about 1 tablespoon) along the long edge of a tortilla. Repeat with the spinach and cheese. Roll the tortilla up, starting with the straight edge. Place seam-side down on an oiled baking sheet. Repeat with remaining tortillas.
  5. Brush the taquitos with olive oil or spray with cooking spray. Bake for 10 minutes, then turn them over and bake for until 10 minutes, or until crispy.
Each taquito has approx. 180 calories, 9 grams fat, 6 grams carbs, 1 gram fiber, 18 grams protein

The recipe was pretty good...would have better if I hadn't burnt the ends of the taquitos.  I served it with black beans on the side.

Recipe gets a 3.5 out of 5.   I would have preferred more spinach (next time I may double it).

Tuesday, September 25, 2012

My Broccoli Cheese Rice Cups

I found this Cheddar Broccoli Rice Cup recipe on Pinterest. The original recipe sounded great for us - some veggies, but otherwise I thought we had everything else in our cupboard.  So I picked up some fresh broccoli and started making it one night.

And I didn't doublecheck my recipe. And I didn't actually have all the ingredients.  So here is my twist on the recipe. No chicken broth and no ranch dressing.  So I improvised.


My Mexican Cheese Broccoli Rice Cups

Ingredients:

1 cup quick-cooking rice, like Minute Rice
1.5 cup vegetarian broth
10-oz chopped broccoli, steamed and excess water squeezed out
3/4 cup shredded Mexican cheese, divided

2 eggs, lightly beaten
1/2 teaspoon salt and freshly ground pepper to taste

Directions

1. Prepare rice as directed on package, substituting stock for water.  Place cooked rice in a large bowl and let cool slightly.
2. Add the remaining ingredients, using only 1/2 cup of the cheese, and stir until combined.
3. Fill eight well-greased muffin cups and top with remaining 1/4 cup cheese.
4. Bake 25 minutes at 350 degrees or until tops are lightly browned and edges are starting to get crispy.


Final Product

Our Review - Honestly mine were a little watery in comparison.  I will actually probably try this again and use the ingredients from the original poster.  It was good, but sort of weirdly "breakfasty" - with rice. 

So it's gets 3 out of 5 stars from us.

Enjoy.


Monday, September 10, 2012

Pinterest Brunch - Harder is better, but not for paper.

And today was brunch with the girls.  I purchased an amazing cake from Occasionally Cake in Alexandria, Virginia.  Here's a picture of it.  Simple, but pretty.  It's a Bellini - Peach Cake with Champagne frosting.  Awesome is the only word for it.


I made this Bacon, Tomato, and Cheddar Breakfast Bake with Eggs, which I pinned on Pinterest.  The original recipe is from Food and Wine.  Everyone really liked it.

And here's our take on that recipe.

Ingredients

1 pound bakery wheat bread, cut into 1-inch cubes (16 cups)
1/4 cup extra-virgin olive oil
1 pound sliced reduced sodium bacon, cut into 1/2-inch pieces
1 large onion, roughly chopped
One 28-ounce can whole Italian tomatoes—drained, chopped and patted dry
1/2 teaspoon crushed red pepper
1/2 pound extra-sharp cheddar, shredded (about 2 cups) , low fat
1/2 pound Monterey Jack cheese, shredded (about 2 cups), low fat
2 tablespoons snipped chives
1 3/4 cups low-sodium chicken broth
Salt
8 large eggs 

Directions

  1. Preheat the oven to 350°. Lightly oil a 9-by-13-inch glass baking dish. In a large bowl, toss the bread with the olive oil and spread on a large rimmed baking sheet. Bake for about 20 minutes, tossing once or twice, until the bread is golden and lightly crisp.  
  2. Meanwhile, in a large skillet, cook the bacon over moderately high heat, stirring occasionally, until crisp, about 8 minutes. Transfer the bacon to paper towels to drain; reserve 2 tablespoons of the fat in the skillet. (We cooked half the bacon the microwave - because this took forever)   
  3. Add the onion to the skillet and cook over moderate heat, stirring occasionally, until softened, about 5 minutes. Add the tomatoes and crushed red pepper and cook until any liquid is evaporated, about 3 minutes. (We drained the can, but I didn't pat them dry or chopped them - this would have been a good idea.)  
  4.  Return the toasted bread cubes to the bowl. Add the contents of the skillet, along with the bacon, shredded cheeses, chives and broth. Stir until the bread is evenly moistened. Season with salt. Spread the mixture in the baking dish and cover with lightly oiled foil.  
  5. Bake the bread mixture in the center of the oven for 30 minutes. Remove the foil and bake until the top is crispy, about 10 minutes longer. Carefully remove the baking dish from the oven and, using a ladle, press 6 indentations into the bread mixture. Crack an egg into each indentation. Return the dish to the oven and bake for about 15 minutes, until the egg whites are set. 
We thought the eggs still looked funny, so we broiled the top for about two minutes.  They were still awesome - just harder.


  Make Ahead The recipe can be prepared through Step 4 and refrigerated overnight.


What is looks like at Step 4


Hopefully, you'll enjoy this recipe.  It has a lot of cheese and bread, so maybe not the healthiest meal in town, but not too horrible with the wheat bread, decreased sodium bacon, and low fat cheese.

I also tried my hand at making a homemade birthday banner this week.  I used the circle templates and cutting/measuring board from Creative Memories, a scrapbook company.

I made enough for each letter of "Happy Birthday."


I made all the circles first, then using the same paper, I traced each of the letters I needed. 


I cut out each letter and tried to make sure it wasn't too matchy matchy. I like a more eclectic work.


Then I had to figure out how exactly to place them all together.  It would look silly to have the same color letter on the same color circle.  Because I didn't really plan it out, I had to cut out two more letters so as to avoid that issue.  Then I had to adhere them together.  At first I tried paper clue.  It was hard to do as if you use too much, it got runny and made it hard.  Let them dry for a few minutes.
 Finally I put a hole on the side of each letter and tried to tie them to each other one at a time. Quickly discovered trying to make the ties was hard and the letters wanted to flip over.  So, DH suggested running one long ribbon through them all.  It came out great.  Very festive for a birthday.

And it was great practice for the robot birthday banner I have to make two weeks from now.  It would be better if the holes were at the top I think.  So keep an eye out for the next banner and see if you think it makes a difference.