Two Sides of A Coin

My husband and I wanted a place to share our projects...I do crafting (e.g. cards, sewing, etc...), household projects, and parties for kids. My husband makes toy trucks, household projects (e.g. closet redesign), and helps with party decorations and games. While he's a professional contractor, we do this for fun. We both cook, but I am more likely to try new and different recipes. We'll be trying out Pinterest items and reporting back.

Monday, October 29, 2012

Halloween Party - Monsters, Eyeballs, and Bats, oh my!

Here's an overview of our Halloween Party - Lots of monsters and eyeballs.

I am going to create a blog entry focusing on decorations and another on the food, but  I wanted to share the photos right away.   Thrilled overall with how it turned out.

The items that got the most attention - the bats on the wall and the worms treat.  

But, what we don't have pictures of it - I made the vomiting witch with fruit salad - came out great, so I am disappointed not to share it with you.  I'll add some details, but there is a video on the Liddy B. and Me blog.  

Also, no photos of our costumes -we went as "field chefs" - camflouge bottoms with chef jackets.  Actually the DH's island - he even made me a skirt from BDUs - came out pretty well.   

And no pictures of our guests - we had two astronauts, four of the characters from "Despicable Me," and a flapper girl.  Plus the non-dressers - the "preppy," the "ex-pat" (a friend moving to Baghdad in two weeks to work for our government office), and the mountain man (a friend's new guy, who was so tall and that's what he reminded me of).

The kids enjoyed the mask making area, so I'll be sure to do a small post on how we did that.


Sunday, October 28, 2012

Fancy Mac & Cheese with Shrimp

We started with this pin from Pinterest.  The recipe comes from Annie Eats blog.  And below is my interpretation of this recipe.


Fancy Mac and Cheese with Shrimp


Ingredients

1 lb. whole wheat pasta shapes
1 lb. raw shrimp (31-40 ct.), peeled and deveined, cut in half (if desired)
10 oz. low fat feta cheese, crumbled and divided
Zest of 1 lemon, divided*
½ cup Panko breadcrumbs
2 tbsp. fresh parsley, chopped, divided
5 tbsp. butter, divided
4 tbsp. all-purpose flour
3 cups milk
2 tbsp. fresh dill, chopped
8 oz. Gruyere cheese, shredded (about 2 cups)
½ tsp. salt
½ tsp. ground black pepper


Directions

  1. Bring a large pot of salted water to boil. Cook the pasta until al dente according to the package directions. If you have frozen shrimp like I did (and didn't defrost in the fridge), no problem. Just put the shrimp in a colander and run cold water over it for three minutes or so, until it's mostly defrosted.  Then, drain the warm pasta right over top. If you have fresh or completely defrosted shrimp, drain the pasta well; set aside.  Add the raw shrimp to the warm pasta and toss together.  Either way, the heat from the pasta will partially cook the shrimp.
  2. Meanwhile, preheat the oven to 400˚ F. In a small bowl, combine a handful of the feta, a pinch of the lemon zest*, the panko, 2 teaspoons of the parsley and 1 tablespoon of the butter, melted. Toss with a fork to combine; set aside.
  3. In a medium saucepan, melt the remaining 4 tablespoons of butter over medium-high heat.  Once the butter is melted, whisk in the flour to form a paste. Cook 1-2 minutes, whisking constantly, until light golden brown. Whisk in the milk. Continue to heat the mixture, stirring frequently, until it bubbles and thickens, about 5 minutes.  As soon as the sauce has thickened, remove from the heat and stir in the remaining feta, Gruyere, remaining parsley, remaining lemon zest, dill, salt and pepper.  Pour the mixture over the pasta and shrimp; toss well to coat.
  4. Transfer the mixture to a lightly greased 2½ or 3-quart baking dish.  Sprinkle the breadcrumb-feta mixture evenly over the top.  Bake for 20-25 minutes, until lightly browned and bubbling.  Remove from the oven and let cool 5-10 minutes before serving.


And we loved it!! And it's a five out of five on our scale.  So, it's going in the standby pile.

Next time: Pre-shred the Gruyere cheese, so it moves a bit faster.  And lessen the herbs a bit, as DH thought they were pretty strong. 

* If you don't have an actual lemon zester (mine's from Pampered Chef and it rocks), you can take a fork and basically scrape the lemon, trying to get only the yellow part and none of the white.


Thursday, October 25, 2012

Another Halloween Paper Craft Banner

I made another Halloween banner.  I think this is number 4.  I may be going a bit crazy.  They are just so fun!


This time, I decided to just try to use the paper I had and play with the idea of a banner/garland.

So, I have a pack of small Halloween scrap paper.  I pulled out all the purple and green pages and cut triangles off the bottom.  I think went into other Halloween scrap paper and cut out little symbols and signs - "Creatures of Night", etc...  I thought I would do something with the triangle leftovers, but decided they just looked bizarre.

So, I played with all the cut out pieces laid out on a table.   Eventually after rearranging and rearranging, I found a combination I liked.  Each banner piece got a small black strip with an identical triangle cut out of the bottom and I put a black strip across the top of each piece - this gave the banner some continuity.  Then I took the scrap triangles from the bigger pieces and cut out a square which I glued behind the black piece. I mixed it up so the bottom piece was different from the big one.

I took the individual signs/symbols and cut them out closely.  Then, I used a foam square to mount them.  I added a few paper spiders to some of the web banner pieces.

I have to say I actually love the banner!  I used an exacto knife to make the slits for the ribbon to slide through.  The fabric ribbon makes it much nicer than the curling ribbon I used before.

Enjoy!


Monday, October 22, 2012

Chicken Cordon Bleu in a Pot

And it's time for another Chicken in the Pot recipe...what can I say I am a sucker for easy cooking.

Today, it's Chicken Cordon Bleu from Chef-In-Training.  Of course, I did a little tweaking.  I had to find a way to get some vegetables in there.


Chicken Cordon Bleu in a Pot 

 Ingredients

4 skinless, boneless chicken breast halves (frozen)
1 (10.5 ounce) can condensed cream of chicken soup
1 cup 1 percent milk
4 slices of ham
4 ounces sliced Swiss cheese
1 (8 ounce) package herbed dry bread stuffing mix (Used Arnold brand)

1/4 cup butter, melted

8 oz. frozen peas and carrots
 

Directions

  1. Whisk together the cream of chicken soup and milk in a small bowl. Pour enough of the soup into a slow cooker to cover the bottom.
  2. Add some of the peas and carrots into the sauce.
  3. Layer chicken breasts over the sauce.
  4. Cover with slices of ham and then Swiss cheese.
  5. Pour the remaining soup over the layers, stirring a little to distribute between layers. Add peas and carrots as possible, trying to keep them in the liquid.
  6. Sprinkle the stuffing on top, and drizzle butter over stuffing.
  7. Cover, and cook on Low for 4 to 6 hours, or 2 to 3 hours on High.  My crockpot runs really warm so I set it on low for 4 hours and let it warm for another 3.  I thought it was too soupy looking so I left the lid off and let it evaporate for about 1 hour.
Enjoy!

We liked it.  DH gave it a 5 out of 5.  I gave it a 4 out of 5.  So that's a 4.5 for us - we'll be serving this again!

Next time - add double the peas and carrots to the bottom.  They were awesome and cooked up no problem.

Friday, October 19, 2012

Menu Board for the Kitchen

A newer craft project...I ordered some dry erase contact paper from Amazon. I thought it would be a great item to use for a menu board on the side of one of my kitchen cabinet.   But, I had issues.

FYI - If you leave the writing on the board too long, it really doesn't come off.

I looked into ways to first clean the paper I already hung. I tried several of the remedies from Wikihow.  I tried the Magic Eraser - that took care of some of it.  I also tried hand sanitizer.  And I tried toothpaste and vinegar.  Honestly, the best idea was going over the old marks with a dry erase marker and then wiping it off.  I got it mostly clean.  And I tried to cover what I could with the letters I made

Once that was ready, I started making my menu board pieces.  First I printed out on regular paper the letters - M E N U M T W T F S S.

Then, I cut out red circles and placed the letters on top.


But they looked a little sad.


So I thought glittery foam is never wrong.  I cut two circles slightly smaller than the red circles out.


And I used two sided tape to attach MENU to the top of the contact paper.


And then I placed the days of the week down the side -- no glittery foam board for them. But, I did used foam squares to attach them to the contact paper so they added a little extra dimension.

And overall, it works.  I probably should have actually measured out the days of the week and evenly spaced them.  But I like it.

Maybe when I get a Cricut or Silhouette Cameo, the letters will be a little easier to make items with.  I strongly hinted at my husband how much I really want the Cameo.  We'll see.


Monday, October 15, 2012

Goat Cheese with Herbs - Two Amazing Recipes with Bacon

Pass the Sushi's Original Recipe Photo looked like...
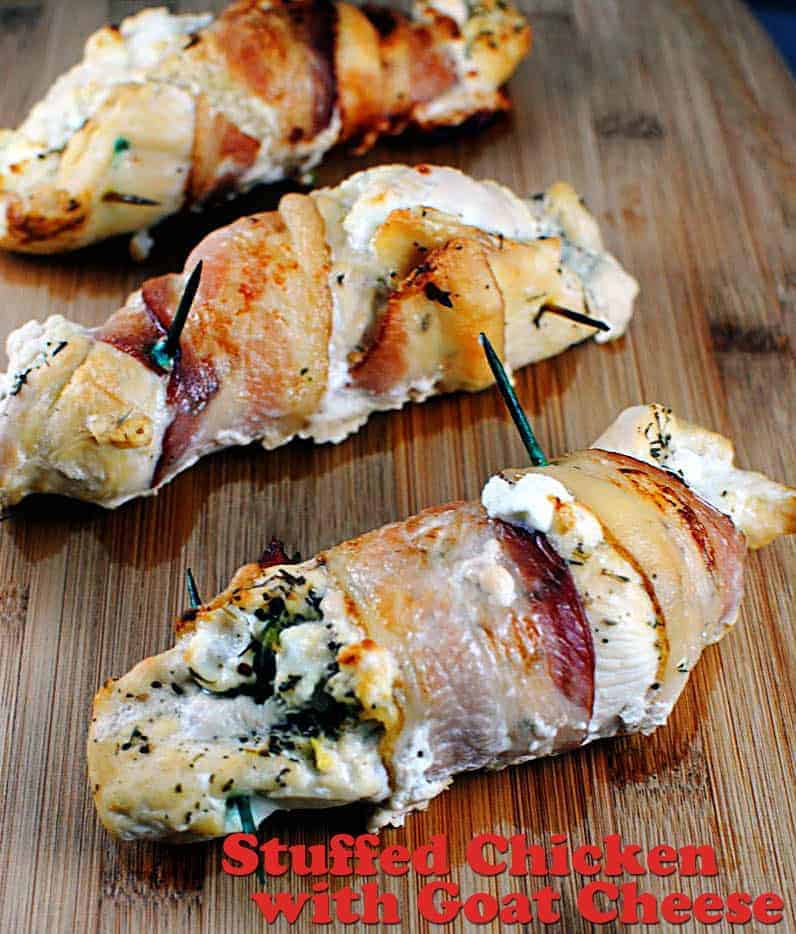
Another Pinterest recipe success....  plus a bonus dish below that a friend made for me last year.  The chicken dish comes from Pass the Sushi.  Here's my take on it.  Below you'll find a recipe for Stuffed Bacon Wrapped Dates. 

Because once you've opened a pound of bacon, you might was well consume it.

Stuffed Chicken with Goat Cheese

Ingredients

3 chicken breasts
1/4 cup goat cheese
1/2 teas basil
1/2 teas thyme
1/4 black pepper
3 slices bacon
toothpick
Olive Oil

Directions


  1. Slice goat cheese into thin strips.
  2. On a flat surface pound out your chicken to 1/4 to 1/2 inch thick. Sprinkle goat cheese in the center of each piece of chicken and sprinkle basil, thyme and black pepper evenly over each. Using toothpicks to secure, fold the chicken up and wrap in bacon.
  3. Preheat oven to 375 F.
  4. Heat oil in a skillet. Place chicken in skillet and cover for 5 minutes. Rotate and brown on all sides.
  5. Place a new baking dish and bake along with the other dish below for 15 minutes.


Stuffed Bacon Wrapped Dates

Ingredients

Medjool Dates
Bacon
Goat Cheese

Directions

  1. Pit the dates by slicing them open on one side and extracting the pit in the center. 
  2. Fill the center with goat cheese.
  3. Cut the bacon in half.
  4. Wrap bacon around the dates and secure with a toothpick.
Both recipes get a 5 out of 5 stars from me.

I might use smaller chicken breasts next time, but otherwise, it rocks.  


Enjoy...

Saturday, October 13, 2012

Healthier Taquitos

Fast, easy and healthy...my favorite way to make a meal.

Again, I pinned this and wanted to give this baked version of taquitos (or flautas, as she calls them) a shot.  My DH loves taquitos, but I have never made them.  Somehow, that deep-fried meat just never appealed to me.  But, baked I was willing to try.


Baked Chicken and Spinach Taquitos

Yields:10 taquitos
Prep Time: 15 minutes; Total Time: 45 minutes

Ingredients

  • 3 boneless, skinless chicken breasts
  • 16 ounces Beer (or chicken broth)
  • 2 cups Water
  • 1 teaspoon Paprika
  • 1 teaspoon Kosher Salt
  • 1 teaspoon Garlic Powder
  • 1 teaspoon ground Cumin
  • 1 teaspoon Chili Powder
  • 3 cups Baby Spinach, chopped
  • 5 burrito-size Flour Tortillas (9 inches) (we used half Carb Friendly tortillas)
  • 1 bag Mexican Cheese, 2%, shredded
  • 1 tablespoon Olive Oil, or cooking spray

Directions

  1. Preheat the oven to 450 F.
  2. Put the chicken in a deep sided saute pan and cover with the beer and water. Bring to a boil, then reduce heat and simmer for 10 minutes. Remove the chicken from the liquid and shred it. Mix together the chicken and seasonings.
  3. Pour out all but 1/4 cup of the cooking liquid. Add the spinach and cook over low heat until for 2-3 minutes, or until the spinach is wilted.
  4. Cut the tortillas in half. Spoon 1/10th of the chicken (about 1 tablespoon) along the long edge of a tortilla. Repeat with the spinach and cheese. Roll the tortilla up, starting with the straight edge. Place seam-side down on an oiled baking sheet. Repeat with remaining tortillas.
  5. Brush the taquitos with olive oil or spray with cooking spray. Bake for 10 minutes, then turn them over and bake for until 10 minutes, or until crispy.
Each taquito has approx. 180 calories, 9 grams fat, 6 grams carbs, 1 gram fiber, 18 grams protein

The recipe was pretty good...would have better if I hadn't burnt the ends of the taquitos.  I served it with black beans on the side.

Recipe gets a 3.5 out of 5.   I would have preferred more spinach (next time I may double it).