Two Sides of A Coin

My husband and I wanted a place to share our projects...I do crafting (e.g. cards, sewing, etc...), household projects, and parties for kids. My husband makes toy trucks, household projects (e.g. closet redesign), and helps with party decorations and games. While he's a professional contractor, we do this for fun. We both cook, but I am more likely to try new and different recipes. We'll be trying out Pinterest items and reporting back.

Friday, October 19, 2012

Menu Board for the Kitchen

A newer craft project...I ordered some dry erase contact paper from Amazon. I thought it would be a great item to use for a menu board on the side of one of my kitchen cabinet.   But, I had issues.

FYI - If you leave the writing on the board too long, it really doesn't come off.

I looked into ways to first clean the paper I already hung. I tried several of the remedies from Wikihow.  I tried the Magic Eraser - that took care of some of it.  I also tried hand sanitizer.  And I tried toothpaste and vinegar.  Honestly, the best idea was going over the old marks with a dry erase marker and then wiping it off.  I got it mostly clean.  And I tried to cover what I could with the letters I made. 

Once that was ready, I started making my menu board pieces.  First I printed out on regular paper the letters - M E N U M T W T F S S.

Then, I cut out red circles and placed the letters on top.


But they looked a little sad.


So I thought glittery foam is never wrong.  I cut two circles slightly smaller than the red circles out.


And I used two sided tape to attach MENU to the top of the contact paper.


And then I placed the days of the week down the side -- no glittery foam board for them. But, I did used foam squares to attach them to the contact paper so they added a little extra dimension.

And overall, it works.  I probably should have actually measured out the days of the week and evenly spaced them.  But I like it.

Maybe when I get a Cricut or Silhouette Cameo, the letters will be a little easier to make items with.  I strongly hinted at my husband how much I really want the Cameo.  We'll see.


Monday, October 15, 2012

Goat Cheese with Herbs - Two Amazing Recipes with Bacon

Pass the Sushi's Original Recipe Photo looked like...
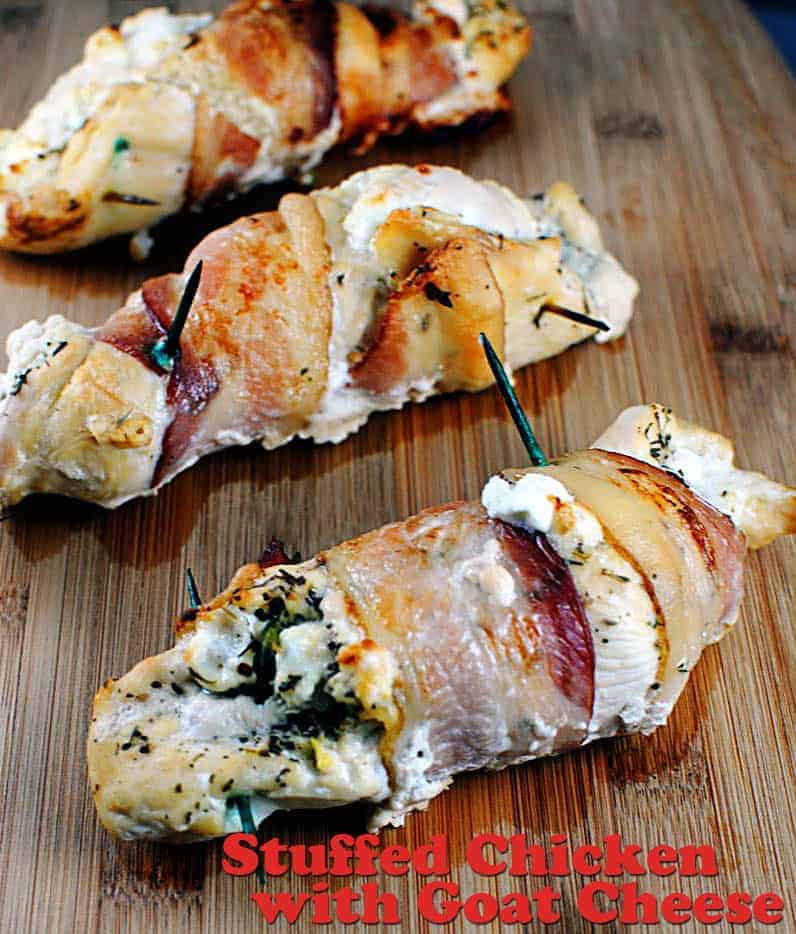
Another Pinterest recipe success....  plus a bonus dish below that a friend made for me last year.  The chicken dish comes from Pass the Sushi.  Here's my take on it.  Below you'll find a recipe for Stuffed Bacon Wrapped Dates. 

Because once you've opened a pound of bacon, you might was well consume it.

Stuffed Chicken with Goat Cheese

Ingredients

3 chicken breasts
1/4 cup goat cheese
1/2 teas basil
1/2 teas thyme
1/4 black pepper
3 slices bacon
toothpick
Olive Oil

Directions


  1. Slice goat cheese into thin strips.
  2. On a flat surface pound out your chicken to 1/4 to 1/2 inch thick. Sprinkle goat cheese in the center of each piece of chicken and sprinkle basil, thyme and black pepper evenly over each. Using toothpicks to secure, fold the chicken up and wrap in bacon.
  3. Preheat oven to 375 F.
  4. Heat oil in a skillet. Place chicken in skillet and cover for 5 minutes. Rotate and brown on all sides.
  5. Place a new baking dish and bake along with the other dish below for 15 minutes.


Stuffed Bacon Wrapped Dates

Ingredients

Medjool Dates
Bacon
Goat Cheese

Directions

  1. Pit the dates by slicing them open on one side and extracting the pit in the center. 
  2. Fill the center with goat cheese.
  3. Cut the bacon in half.
  4. Wrap bacon around the dates and secure with a toothpick.
Both recipes get a 5 out of 5 stars from me.

I might use smaller chicken breasts next time, but otherwise, it rocks.  


Enjoy...

Saturday, October 13, 2012

Healthier Taquitos

Fast, easy and healthy...my favorite way to make a meal.

Again, I pinned this and wanted to give this baked version of taquitos (or flautas, as she calls them) a shot.  My DH loves taquitos, but I have never made them.  Somehow, that deep-fried meat just never appealed to me.  But, baked I was willing to try.


Baked Chicken and Spinach Taquitos

Yields:10 taquitos
Prep Time: 15 minutes; Total Time: 45 minutes

Ingredients

  • 3 boneless, skinless chicken breasts
  • 16 ounces Beer (or chicken broth)
  • 2 cups Water
  • 1 teaspoon Paprika
  • 1 teaspoon Kosher Salt
  • 1 teaspoon Garlic Powder
  • 1 teaspoon ground Cumin
  • 1 teaspoon Chili Powder
  • 3 cups Baby Spinach, chopped
  • 5 burrito-size Flour Tortillas (9 inches) (we used half Carb Friendly tortillas)
  • 1 bag Mexican Cheese, 2%, shredded
  • 1 tablespoon Olive Oil, or cooking spray

Directions

  1. Preheat the oven to 450 F.
  2. Put the chicken in a deep sided saute pan and cover with the beer and water. Bring to a boil, then reduce heat and simmer for 10 minutes. Remove the chicken from the liquid and shred it. Mix together the chicken and seasonings.
  3. Pour out all but 1/4 cup of the cooking liquid. Add the spinach and cook over low heat until for 2-3 minutes, or until the spinach is wilted.
  4. Cut the tortillas in half. Spoon 1/10th of the chicken (about 1 tablespoon) along the long edge of a tortilla. Repeat with the spinach and cheese. Roll the tortilla up, starting with the straight edge. Place seam-side down on an oiled baking sheet. Repeat with remaining tortillas.
  5. Brush the taquitos with olive oil or spray with cooking spray. Bake for 10 minutes, then turn them over and bake for until 10 minutes, or until crispy.
Each taquito has approx. 180 calories, 9 grams fat, 6 grams carbs, 1 gram fiber, 18 grams protein

The recipe was pretty good...would have better if I hadn't burnt the ends of the taquitos.  I served it with black beans on the side.

Recipe gets a 3.5 out of 5.   I would have preferred more spinach (next time I may double it).

Butternut Squash and Apple Soup ...Absolutely Amazing!

The best soup recipe I have made in YEARS!!! Amazing.  Absolutely amazing.

My DH had to leave town for a few days this week.  Since I was home alone, I wanted to make a vegetarian meal for me.  So, I pulled this Butternut Squash and Apple Soup from Pinterest.  The original recipe came from NPR.


I tweaked it a bit, so here's my take.


Ab Fab Butternut Squash and Apple Soup


Makes 4 to 6 servings

Ingredients

1 butternut squash, about 2 pounds, peeled, seeded and cut into 1-inch chunks
3 firm, sweet apples, such as Braeburn, Pink Lady or Jazz, peeled, cored and quartered
1 large onion, peeled and roughly chopped
1 tablespoon Garlic Chili Sauce
2 cloves of garlic, unpeeled and crushed
1 teaspoon kosher salt
1 teaspoon freshly ground black pepper
1/2 teaspoon coriander seeds
2 teaspoons finely chopped fresh rosemary
3 1/4 cups vegetable broth
2/3 cup light cream


Directions

  1. Preheat oven to 400 degrees.
  2. Spread the squash, apples, onion, and garlic on a baking sheet. Sprinkle with the salt, pepper, coriander and rosemary. Roast for 45 minutes to 1 hour, or until all the vegetables are cooked through and golden.
  3. Remove the vegetables from the oven. When they are cool enough to handle, squeeze the garlic from the peel. (I forgot to do this, but it didn't make any difference.) 
  4. If you have an immersion blender, scrape the vegetables into the crockpot with the vegetable broth. Deglaze the baking sheet with 1/4 cup boiling water, scraping at the burned-on bits to capture them. If you are using a countertop blender, deglaze the pan as above and pour roughly 1/3 of the vegetables from the baking sheet into the blender/food processor and puree. Transfer puree to the crockpot. Continue this process with the rest of the vegetables.
  5. Once the vegetables are pureed, put the crockpot on warm and let it cook all day.  I left it on warm for 8 hours. Then, stir in the cream and let it warm up for about 30 minutes or until the soup is warmed through and reaches your preferred consistency.
  6. To serve, divide into bowls. 
And it was amazing.  I give it a 5 out of 5 stars.   Hope you enjoy it as much as I did.


Wednesday, October 10, 2012

Halloween Decorations...let the crafting begin

So I am really working on crafting for Halloween this year.

The pictures below are just the beginning.

Photo 1 and 7 - I have made two more banners so far. The first banner was an easy one. So, I stepped it up a notch with photo 1 and 7 below.  I picked up Halloween scrapbook paper from Michael's.  I created my first pinwheels using these directions.  Note to those who try pinwheels - if the paper flakes when folded, they don't look as good.  And really, you need to make the seam seamless. Something I have not accomplished yet.  I cut the paper letters out from paper and glued them in the center of each one. I glued a spider onto a few of the SPOOKY banner pieces just to make it more 3D. A hole punch in the top corners and I used black curling ribbons to string them up over two window in my house.


Photo 3 - I had a photo-fronted key holder behind my front door. It was pretty boring as you can see.  So, using some cool Halloween paper, I put a 5x7 piece in each window and then taped the BOO across the top.  Popped in back in place and now it's a great seasonal piece.  Thinking of doing the same for Thanksgiving, Christmas, Valentines, etc....

Photos 2 & 4 - These were so easy.  Photo 2 is the back of my front door, so you can see parts of 3 & 7. I took magnet tape and cut it into tiny strips.  Removed the tape from the backs and attached tiny magnets on the back of each plastic spider. Voila - then placed them on the door.  Great effect with little fuss.

Photo 5 and 10 - The monsters are just fun to create.  Really making you think outside the box. I am going to give the monsters away at my Halloween party as prizes.

Photo 6 - Loved this ghosts and monster pieces from the Bowdabra blogger. Easy to make and fun. I have to admit I cheated and didn't really make bows. I just tied the tops. I mailed them in care packages to my cousins in college and my grandparents. I also dropped off a few at my hair stylists.  Everyone loved them.

Photo 8 - Simply combine a great sign with an all feather wreath.  Great combination that totally works.

Photo 9 - I wadded up newspaper and put it in the middle of an old sheet.  Attached the arms to the ends of my window valance with paperclips.

I still have more decorations to do, but I wanted to give you all a preview of just a few of the items.


Sunday, October 7, 2012

Chili Maple Chicken in a Pot

We have an unusually amount of frozen chicken breasts right now, so I am working through my chicken recipes from Pinterest.  The blog connected to the pin has a ton of recipes for "dump" chicken - meaning you can dump the ingredients in a bag and even freeze them for later. 

The other night, we made Chili Maple Glazed "Dump" Chicken.  I changed up the recipe and am calling it "Chili Maple Chicken in a Pot."  Why? Because I threw it all in the crock-pot in the morning and just let it go.


Ingredients

2 Chicken Breasts
3 tablespoon water
1 teaspoon salt
1 1/2 tablespoon maple syrup
1 tablespoon chili powder
 

Directions

Place all ingredients into our tiniest slow cooker. I let it sit in the fridge overnight, so it was ready to pop in the crock-pot with no additional ingredients.  In the morning, I stirred it, so the chicken was coated. Left the slow cooker on low for 7 hours and warm for another 3. 


And what did we think?  We actually loved it.  Great tasting, moist chicken.  I served it over rice with peas mixed it.  We give it a 4.5/5 stars.


Tuesday, October 2, 2012

Birthday Treat...& Halloween Gift


So, one of my BFFs has an early October birthday.  I thought I would give her something cool to decorate her house for Halloween.  I had some leftover snakes from two cowboy birthday parties I helped throw this past summer, including on for her son.  And what do you do with leftover snakes?

Duh, you make a wreath.


I bought a grapevine wreath at Michael's  and picked up a few more rubber snakes from several places. Weirdly they can be hard to find. I used a grey metal paint and spray painted each of them in the grass in my yard.  I left a few in their "natural" color - that's the light blue and the two green ones.  I also didn't spray paint their tongues - I thought the itty bit of red made them more interesting.

After letting them dry, I spent forever weaving them onto the wreath.  I didn't want to use clips or ties.  So, they are actually woven through the grapevine shape.

I gave it to her a few days early.  And her kids love it.  While she doesn't love the snakes, she does like having a cool decoration for Halloween.